As the Laneway House series continues, this next instalment builds on the behind-the-scenes look that Senior Product Manager at Longboard Jason Haveruk has been working on. Earlier in the series, Jason walked through prepping the wall, installing the weather resistive barrier, setting the SD clip layout, and fastening the clip, foundational steps that establish the structure and spacing for everything that follows. Each of these earlier decisions set the stage for the assembly’s performance, appearance, and durability.
With those elements now complete, the focus shifts to the layer that gives the wall its depth, alignment, and structural rigidity: the insulation and girts. This stage marks a transition from groundwork to shaping the final cladding plane, including the detailing needed to pull the windows forward and ensure the top-of-wall components remain solid.
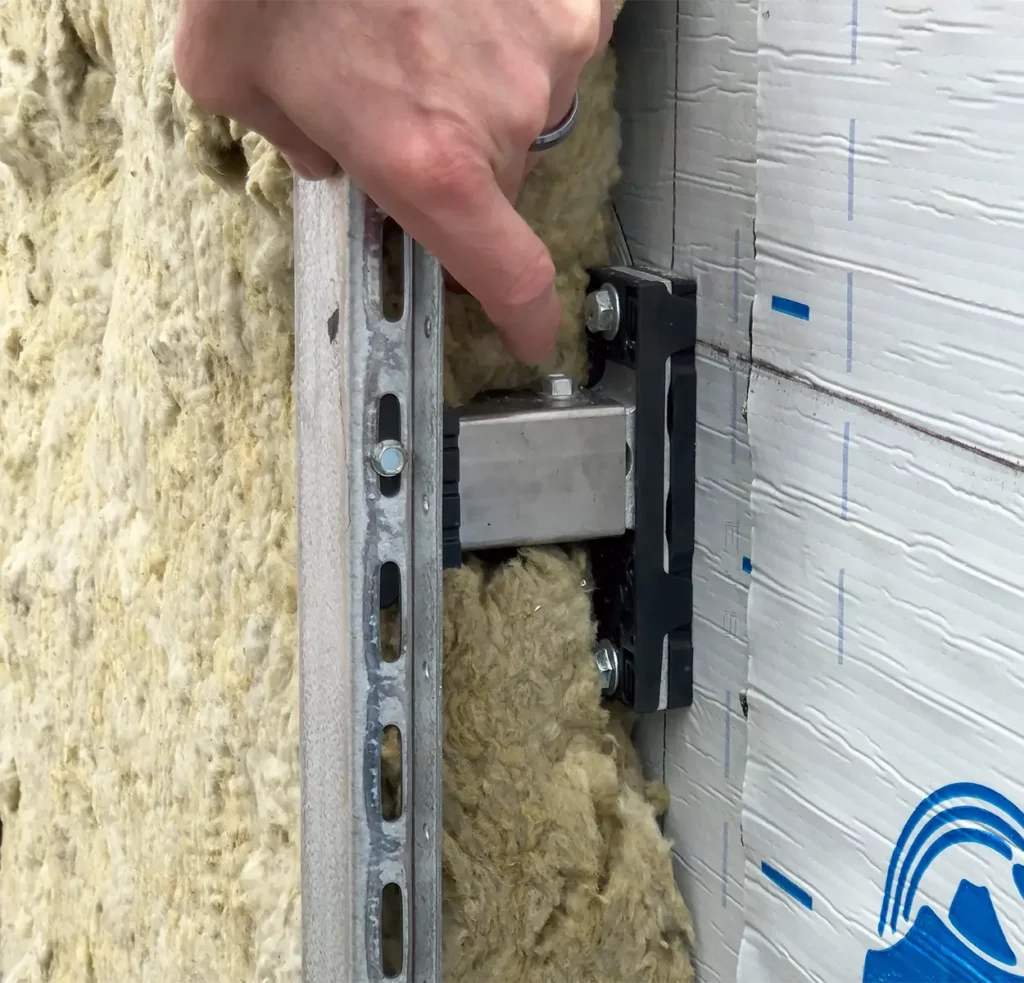
Insulation & Girts Setup We’re using 1½ inch Rockwool mineral wool across the wall. The clips installed earlier now protrude through the insulation, and our standard girts, with flanges on both sides, are fastened over them. Each clip gets a fastener on both sides, and the girts are laid out at 32″ x 48″ spacing.
This creates a stable support system ready for cladding.
Bringing the Windows Forward The window on this wall is pulled forward so it sits flush with the standard girts. That’s done using a wood window buck, built out from the sheathing and WRB to match the depth of the insulation and girts. This makes detailing and cladding around the window cleaner and more secure.
Girt Layout Around the Opening Standard girts continue across the wall and simply terminate beneath and above the window. Even though the last anchor point may be farther from the window, the cladding will still be supported by the solid window buck, which also carries the window trim.
Bridge Girts at the Top Near the top of the wall, we tie in bridge girting using girt connectors. This stiffens the assembly so the two-piece termination cap for the cladding can snap in properly without flex. This stage brings the wall assembly to a crucial turning point: everything is aligned, reinforced, and ready to receive cladding. By coordinating the girts, window buck, and top-of-wall detailing, we’ve laid the groundwork for a clean, durable finish.